How to install and activate a eSIM on Samsung

• Put a digital SIM on your Samsung device
• Get instant mobile data in your destination

When do I install and activate my eSIM on my Samsung device?

It’s important to install your Samsung eSIM when you have a strong Wi-Fi or data connection to avoid installation errors.

For a smooth international journey, it is advisable to install your eSIM data package before commencing your trip. This ensures that you can verify its proper installation while still at home.

Nonetheless, if you prefer to start using eSIM data right away, it is also feasible to install your eSIM while already traveling internationally.


How eSIM installation on Samsung device
How eSIM activate on Samsung device

Will my data package be activated immediately upon installing my Samsung eSIM?

No! If you’ve purchased an eSIM data package for a different country and you’re setting it up while still at home, your Samsung device won’t be able to connect to any of those networks. Therefore, there’s no chance of your data package being activated unless you go into your Settings and manually activate it.

Even if you’ve acquired an eSIM data package for the country you’re presently in, your Samsung device won’t automatically activate the eSIM data package. You need to follow the activation steps before it can connect to a compatible network.
How to install and activate your Samsung eSIM

Once you’ve purchased an eSIM data package from us, you need to install and activate your eSIM (digital SIM) on your Samsung device so it’s there when you need it.
Step 1
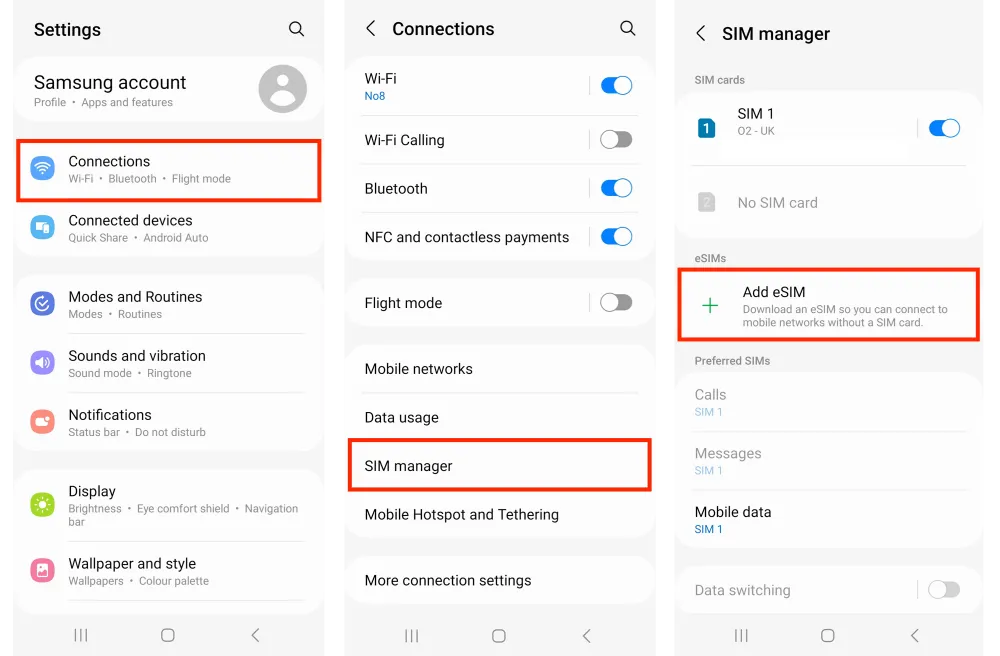
Go to "Settings" then "Connections"
• Open the Settings on your Samsung device and choose the Connections option.
• Tap SIM manager or SIM card manager depending on your device.
• To add your new eSIM, you’ll tap Add eSIM.

(Depending on your device, it might also say “Add mobile plan”)
Step 2
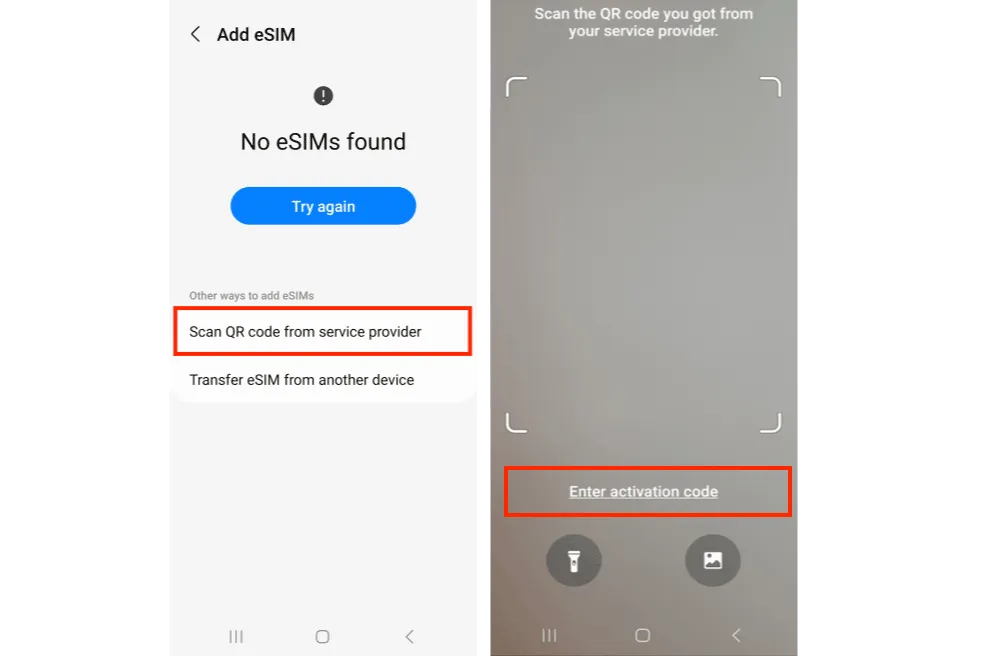
Scan your QR code off another device
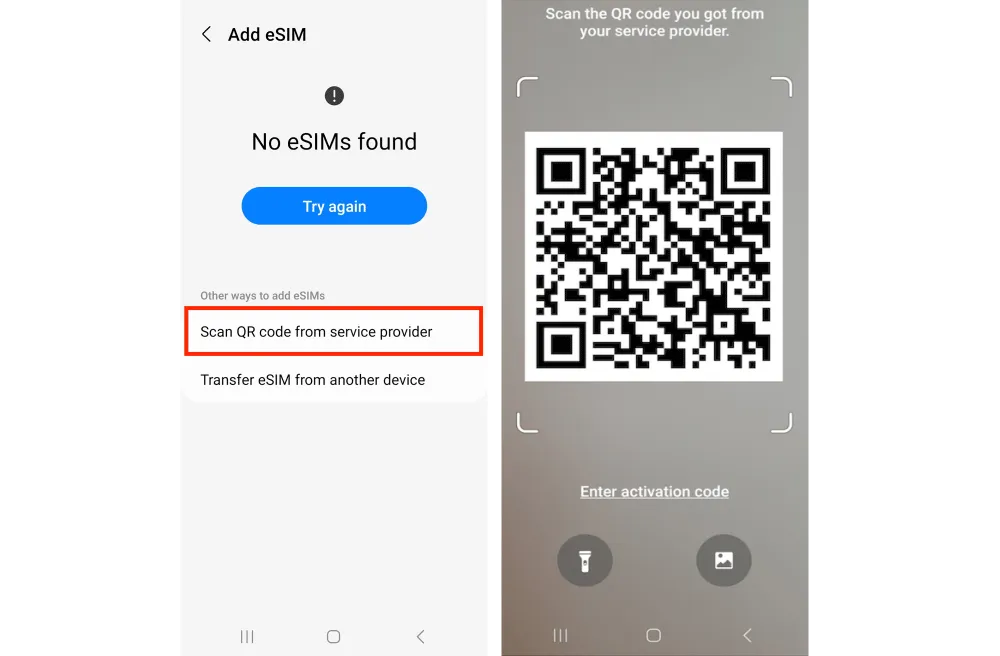
• Tap Scan QR code from service provider.
• Now scan the QR code provided.

If you have a Samsung Galaxy S22 or newer, tap the photo icon to upload a screenshot of your QR code instead.
Step 3
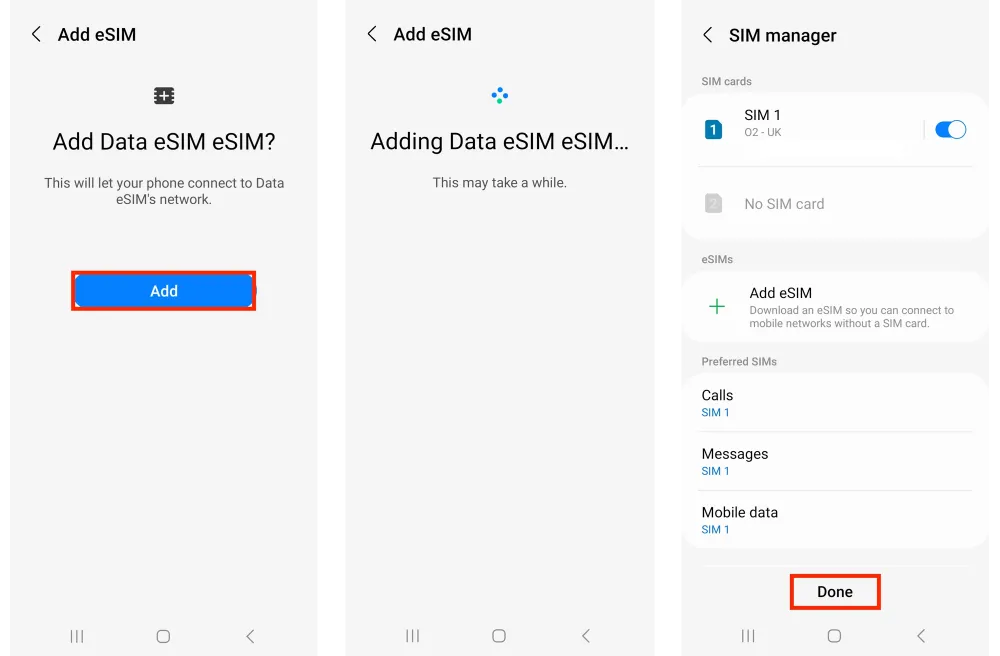
Approve the eSIM installation
• When prompted, tap Add.
• Allow up to 10 minutes for the eSIM to activate.
• Tap Done.
Step 4
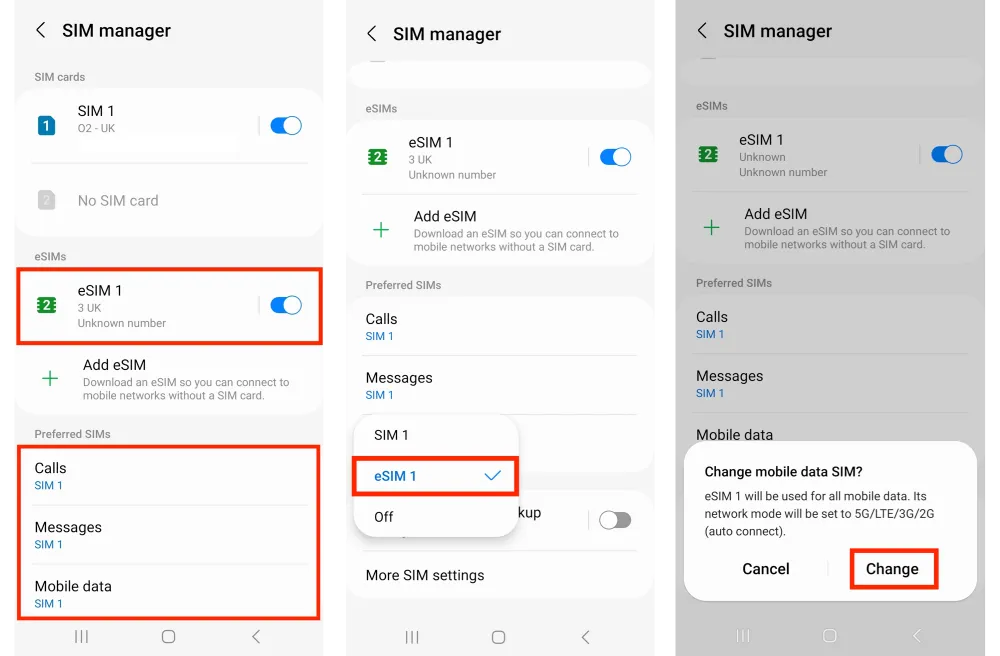
Now configure your SIM / eSIM settings correctly
• Leave Calls and "Messages" set to your original primary SIM.
• Tap Mobile Data.
• Select the eSIM.
• Tap Change.

• Your eSIM might be automatically called “eSIM 1” or “eSIM 2”.
Rename your eSIM to EuroSIM (recommended)

Your Samsung Phone could activate the plan immediately. To avoid using data before your trip, switch off roaming on all your mobile data plans. We recommend activating the eSIM only at the destination.
Well done!
Your eSIM is installed and ready for activation.
(Please activate your eSIM only upon arrival at your destination)
Step 5
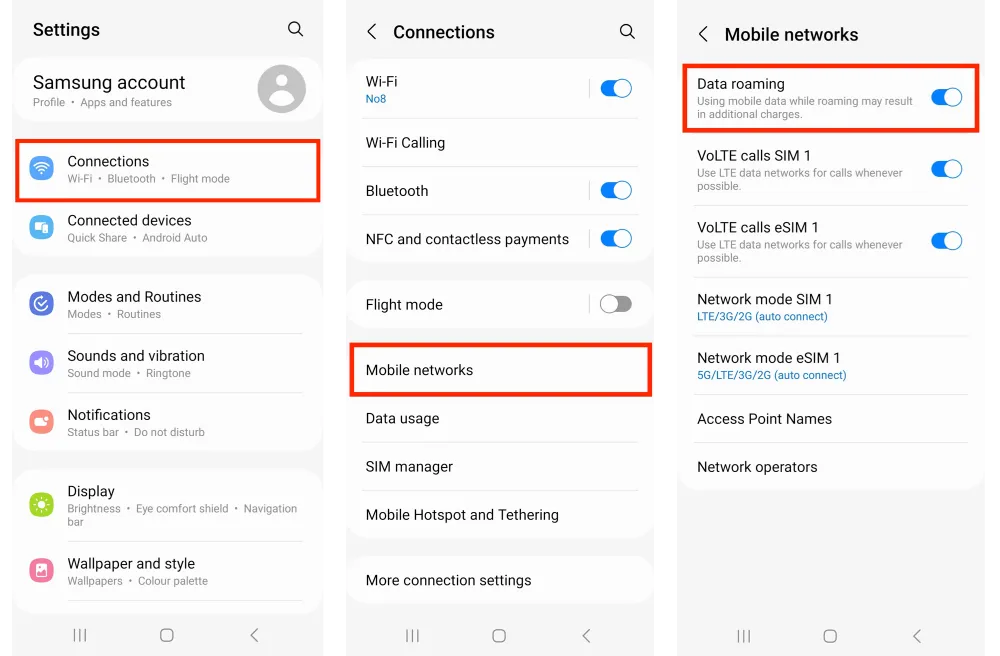
Ensure Data Roaming is Active
• Go to Settings.
• Then to Connections.
• Mobile networks and Ensure Data roaming on the eSIM is turned on.

Important:
Data roaming MUST be ENABLED for the eSIM to function properly!

Turn off data roaming on your primary SIM to avoid unexpected high bills from your primary network provider.
Support
Need help? We’re always here!
If you have completed the steps above, but your eSIM did not install correctly, please contact our Technical Support via email ([email protected]).

Our Support team is available if you have questions about any part of the Samsung eSIM activation process.
Step 1
Go to Settings on your device
• Go to Settings on your device and Tap Mobile / Cellular Data.
• Tap Add eSIM and Tap Scan QR code from Service provider.
• Tap Enter Details Manually.
Step 2
Enter Activation Code
• Enter the SMDP+ Address and the Activation Code (SMDP+ ID) provided.
• Tap Connect.
Step 3
Approve the eSIM installation
• When prompted, tap Add.
• Allow up to 10 minutes for the eSIM to activate.
• Tap Done.
Step 4
Now configure your SIM / eSIM settings correctly
• Leave Calls and Messages set to your original primary SIM.
• Tap Mobile Data.
• Select the eSIM.
• Tap Change.

*Your eSIM might be automatically called eSIM 1 or eSIM 2.
Rename your eSIM to EuroSIM (recommended).

Your Samsung Phone could activate the plan immediately. To avoid using data before your trip, switch off roaming on all your mobile data plans. We recommend activating the eSIM only at the destination.
Well done!
Your eSIM is installed and ready for activation.
(Please activate your eSIM only upon arrival at your destination)
Step 5
Ensure Data Roaming is Active
• Go to Settings.
• Then to Connections.
• Mobile networks and Ensure Data roaming is turned on.

Important:
Data roaming MUST be ENABLED for the eSIM to function properly!
Support
Need help? We’re always here!
If you have completed the steps above, but your eSIM did not install correctly, please contact our Technical Support via email ([email protected]).

Our Support team is available if you have questions about any part of the Samsung eSIM activation process.